
When I saw this darling eyelet sleeveless top on Mama In A Stitch’s page, I had to convert this pattern to the double-knit loom.
I chose to use the same yarn that Jessica used in her pattern – knitting with 2 strands of different colored LB Cotton Jeans yarn. The gauge matched perfectly using my 28” KB board.
I also chose to make the eyelet holes 4 stitches apart but could have easily made them 3 or even 2 stitches apart (and probably should have). Consider making that change if you choose to knit this pattern.
This beautiful top is super warm – really thick because it is double-knit. I love it and hope you will enjoy making it as much as I have!
Kudos again to Jessica at Mama In A Stitch. I love her easy and cute patterns and hope you will visit her site for more inspiration.
Eyelet Sleeveless Top
(Adapted for the loom from Mama In A Stitch’s Pattern)
Materials:
28” KB Loom
5 Skeins Lion Brand Yarn LB Collection Cotton Jeans Yarn in Indigo (100g/skein)
5 Skeins Lion Brand Yarn LB Collection Cotton Jeans Yarn in Sunbleached (100g/skein)
Tapestry needle
Gauge: 3.25 stitches = 1” & 4 rows = 1”
Measurements:
Small: 34” bust, 21” length, 17” back
Medium: 38” bust, 22” length, 19” back
Large: 42” bust, 23” length, 21” back
This top is knit in two separate panels which will be seamed at the sides and shoulders.
Instructions
Panel (Make 2)
Holding 2 strands of yarn (one of each color), cast on 57 (63, 69) stitches.
Bottom Ribbing
Row 1: *K3, P3 on both sides of the board, repeat from * across
Rows 2 – 6: Repeat Row 1
Body
Mark every 4th peg on front and back board (I used a Sharpie on my board, which I will erase with nail polish remover later)
Note: If preferred, you can mark every 2nd or 3rd to get a lacier effect.
Rows 1 – 8: Knit in Stockinette stitch
Row 9: On front of board, move loop from every 4th peg to the peg on the right.
On back of board, move loop from every 4th peg to the peg on the left.
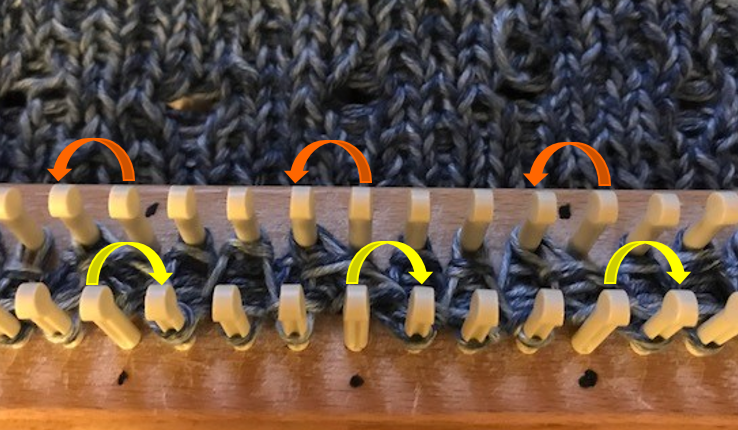
Wrap Stockinette stitch as normal.
- On the front board, you will now have 1 loop on each 4th peg, 3 loops on the pegs to the right and 2 loops on the rest.
- On the back board, you will now have 1 loop on each 4th peg, 3 loops on the pegs to the left and 2 loops on the rest.
Row 10: Knit in Stockinette stitch
Repeat Rows 1 – 10 until your piece measures in length as desired – 21” (22”, 23”).
Cast off.
Repeat pattern to create your second panel.
Assembly
Using your tapestry needle and yarn, seam at shoulders using the mattress stitch leaving opening for your head and neck. Seam up sides leaving opening for your arms.

Happy Looming!

Jen on
This is beautiful, I can’t wait to try it. Question though: what cast on and bind off did you use?
Thank you!
Chris on
Hi Jen! I used the standard Stockinette cast on and my preferred bind-off method you can find here. Chris